Lega User FAQ
Here are some frequently asked questions about the platform.
🧭 How do I navigate the site?
-
There are several ways to navigate the site. Mainly you can use the left side-bar navigation to access main sections of the platform like Home, Explore, Create, and Manage.
You can collapse and expand the left side bar (and right side bar inside an app) by clicking on the << or >> in the upper lefthand corner.
You can access your most frequently used apps under Start a new conversation on the Home. Your last accessed apps will automatically appear here. You can also jump into your previous conversations from Home. You can access all of your available apps available from the App Library.
☑️ What is the Compliance Acknowledgment?
- If your organization has enabled Compliance Acknowledgment, it will pop up when you initially log into Lega and you’ll need to accept the terms in order to use the platform. Its purpose is to make you are aware of your organization’s conditions for using Lega and generative AI. Please make sure that you read them carefully before accepting and using the platform.
🗣️ Can I access previous conversations?
- You can access your previous conversations in several ways:
- From Home you can access and search conversations under Pick up where you left off.
- From Conversation History in the left navigation bar, you can access and search all previous conversations here.
- From within an app itself, you can access your most recent interactions with that app by clicking into the chat bubble icon on the right-hand side. You can jump into one of those conversations or click View all to be taken to your full Conversation History.
⚙️ What’s inside an app?
Apps are how you’ll interact with different large language models. Any app available to you will be accessible through the App Library. Certain apps your firm finds valuable will also be pinned in the left-side navigation panel. Below is a list of what you’ll find when you click into an app:
-
The app name will appear at the top of your screen. If you click the drop down next to the app name, you will get a description of the app including which model and any resources it’s utilizing, and whether it is a shared or private app.
If instructions on how to use the app have been provided by the app creator, they will appear as a chat bubble when you first click into the app.
This is the prompt box.
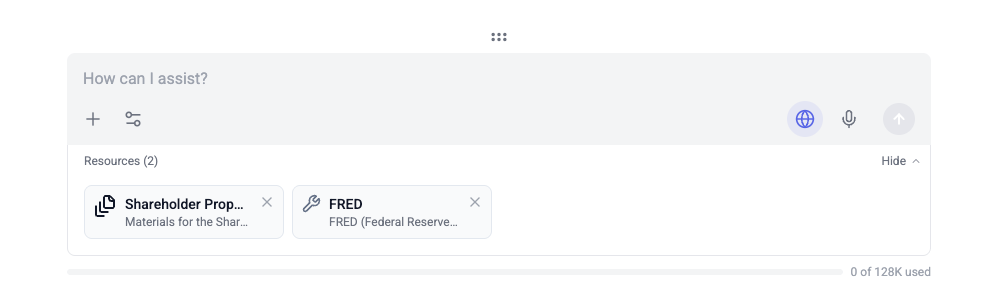
App Promp Box Here you can simply enter your prompt and hit go or:
- Click the plus icon to:
- Upload a document from your computer or the document manager. You can upload up to 10 documents at one time as long as they do not exceed the context window limit. Once you upload a document from your computer, it will then appear in the document manager moving forward. Learn more about uploading documents here;
- Use a saved or shared prompt (see more about using saved prompts here);
- Open the Prompt Editor to customize a prompt for use in your current chat (no changes will be made to the parent prompt). See more about prompts and parameters here;
- Add tools or knowledge sources. If an app creator has enabled users to change the tools or knowledge sources accessible by an app, those options will be lit up for end users under the plus icon. You can then select the resources you wish the app to rely on when responding to your queries. If permitted, you can also easily remove resources associate with an app by clicking Show beside resources and selecting 'X' next to the resource you want to remove.
- Model Options and Settings: If an app creator has enabled a user to change the model and settings used by the app during their conversation, a slider bar icon will appear in the prompt box. Click this icon to change the model and settings best suited for your current conversation.
- Web Access: If an app creator has enabled an app to retrieve content from specific websites or pages, you will see a globe icon in the prompt box. The icon will be blue if web search is enabled (this is the default). To disable web search, simply click the globe icon and it will turn gray.
- Voice input: click the microphone icon to interact with an app using your device's microphone.
- Expand your prompt field using the ∶∶∶ icon for longer prompts.
- Keep track of your token usage using the token counter below the prompt box. This tracks the tokens you have used per conversation. Starting a new conversation will clear your token count.
- Click the plus icon to:
- Start a new conversation by clicking New in the upper right corner.
- Access your recent conversations with a particular app using the chat bubble icon. Click View all access your full Conversation History (this will exit the app you’re in).

NOTE: Any changes made to an app using the above features are transient and will apply only to the current conversation. The changes will not affect the parent app. All settings will revert to their original state when you return to the app for future user.
🛠️ What is the Lega Sandbox?
- The Sandbox is a place where you can easily compare models, prompts, and responses to evaluate quality and performance. Simply enter a prompt (or use a saved prompt), choose your models and optionally tweak the system messages and settings. Then click go and compare the results to decide what works best for your use case. You can access this functionality by visiting the Lega Sandbox in the left navigation bar or from within the Lega Lab via the Compare Models card at the top of the page.
📝 What are saved prompts and how do I use them?
-
Saved prompts are an easy way to reuse a tried-and-true prompt with any app to accomplish specific tasks. You can use and save prompts from within an app or from the Prompt Library.
To use a saved prompt from within in app, click the plus icon in the prompt box and select the prompt you want to use. In the tabs at the top, you’ll see your saved prompts as well as prompts that have been shared with you. Click on the desired prompt and then hit Select prompt. The selected prompt will appear in the prompt field, and you can either use it as is or edit it as needed before you hit send. To edit or add to the existing parameters in a saved prompt, click into the parameter you want to edit to make your desired changes. You can also open the Prompt Editor using the plus icon. Your edits will only exist in your current conversation and will not change the parent prompt. Tip: for longer prompts, you can expand the prompt box to see the full text by using the ∶∶∶ icon at the top of the prompt box.
Don’t see the prompt you’re looking for? You can create a new prompt using the New Prompt button, which will open the Prompt Editor. From within the editor, you can create and customize your prompt and prompt parameters to fit your needs. Learn more about parameters here.
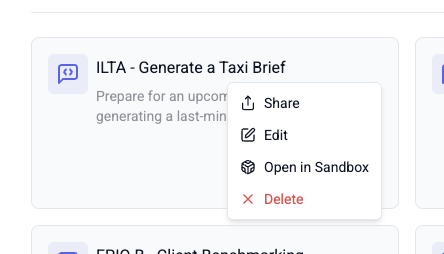
Finally, you can easily save a prompt that you really like from within the conversation itself. Simply click on the ⋯ below the prompt you want to save and then click Save Prompt. A pop up will appear giving you the option to name the prompt and save it as is or click into Advanced to add even more detail using the Prompt Editor before saving.
🤝 How do I share prompts?
-
You can share prompts from the ⋯ in the upper right hand corner of a prompt tile in the Prompt Library. From here you click Share and select the group(s) or individual users you’d like to share.
Groups or users with whom a prompt has already been shared will appear in the popup that opens when you select Share. To stop sharing a prompt with someone, simply click the X next to their name. If the prompt has not yet been shared, no one will appear, and you must select Add Group or User to start sharing.


You can add by clicking blue icon next to the group or individual. One added the icon will turn to a red X. To remove sharing permission from that user/group, simply click the red x.


{{ }} What are parameters and how do I use them?
-
Parameters are placeholders in prompts that let you customize responses by inserting specific details when the prompt is used. For example, a parameter like
{{name}}can be replaced with a user's name, making the app’s answers more tailored and dynamic. This helps create flexible prompts that adapt to different situations without needing to rewrite them each time.You can create a prompt using parameters in the Prompt Library, where you can name your prompt (e.g. Document Summarizer), give it a description (e.g. this is a prompt for easy document summarization), and then enter your desired prompt (e.g. Please summarize this document into 3-5 sentences).
To include parameters in your prompt, simply put the name of the parameter in double squiggle brackets {{ }}. You can use as many parameters in a prompt as needed. For example, if you want to add a parameter to the example prompt above, you might say: Please summarize this {{document}} into 3-5 sentences. Then go to the Parameters tab at the top to further define the parameter type.
Under Parameters, the text you entered in the {{ }} in your Prompt field will automatically appear in the Name field.
You can then further define it by adding Label, Help, Type, and Required fields.
- Name: This is what will appear above the field for the user to complete and is often the same as Name or something similar (e.g. First Name for first_name).
- Instructions: This will explain what should be entered by the user (e.g. Upload the document you want to be summarized).
- Type: This defines the parameter input. You can choose from string (short text), long text, number, date, choice (multiple options), document (attachment), and URL.
- Required: By checking this box, the user is required to complete the parameter field before sending the prompt to the model.
- Display to user: This feature allows you to display a parameter field upon use or not. For example, if you create a prompt to compare a contract with the same sample contract every time, you may choose to set that sample contract parameter as not displayed because you use the same default value (sample contract) for comparison.
- Default value: See above example. You can set a parameter as a default value so that the user does not have to enter or upload the information every time they use a prompt. e.g. You may have a prompt that asks the LLM to calculate the number of days until a certain holiday, and set {{today}} as a default parameter or set a specific firm marketing guide to help users finesse any thought leadership pieces drafted by a user.
- After you’ve defined your parameters, simply click Save as and you’re all set! The prompt will appear under your Resources in the Lega Lab, the Prompt Library, or Saved Prompts using the book icon in any app. Learn more about using Saved Prompts here.
- A user can also edit or add to the existing parameters in a saved/shared prompt, by clicking into a parameter or opening the Prompt Editor (using the plus icon) and make any desired edits. Those edits will only exist in the current prompt and will not change the parent prompt.
✏️ Who can see and edit my saved prompts?
- Saved prompts are only visible to the user who created them, those with whom they are shared, and System Admins. Only the creator of a saved prompt or a System Admin can edit a saved or shared prompt.
🔍 What is policy scanning?
-
Policy scanning identifies prompts that may violate your organization's compliance policies. While flagged prompts are still sent to the model, you'll be notified if the content requires review. For clarification on flagged prompts and your organization’s policies, please contact your policy administrator.


🌎 How do I change languages?
- To switch languages, go to My Profile in the left navigation bar and select your desired language from the Language drop-down. Lega currently supports French (Canadian) and English language translations.
📴 How do I log out?
- To log out, go to My Profile in the left navigation bar and click Logout.
🆘 Who do I contact for help?
- If you can’t find the answer you’re looking for in the Lega support documentation, we recommend reaching out to your internal team first. For further assistance, you can contact Lega at support@lega.ai.